Hi there,
Journeyman Jay here.
As of today, we have ceased operations in North Edmonton (our service area).
We appreciate all of the homeowners we have had the opportunity to help over the last two and a half years. Thank you for your business, your repeat business, and your referrals.
From this point on we will be focusing on writing and communicating about plumbing to the general public as well as other plumbing professionals.
Thank you,
Jay Bortnik
Journeyman Jay
Journeyman Jay Plumbing
780-266-3939
Wednesday, August 31, 2016

Tuesday, January 5, 2016
Think outside Journeyman Jay
My wife and I started Journeyman Jay Plumbing in early 2014. We are a "micro" plumbing business serving the needs of individual homeowners in our neighbourhood - North Edmonton. We have primarily helped our customers with their faucets, toilets, tubs, outdoor faucets, main shut-off valves, and old drainage pipe. And a couple of times we have plumbed in "new" bathrooms.
From time to time, I have been called upon to work for other plumbing contractors to finish bigger projects. Here is a picture from one of my most recent projects - an elementary school boiler room here in Edmonton (September - November 2015).

Thank you,
Jay Bortnik
From time to time, I have been called upon to work for other plumbing contractors to finish bigger projects. Here is a picture from one of my most recent projects - an elementary school boiler room here in Edmonton (September - November 2015).

Thank you,
Jay Bortnik
Thursday, May 28, 2015
Saturday, February 28, 2015
Plumbing Tight Spots

This is a blog post aimed at anyone who might be thinking of "finishing" or "renovating" their house, basement, bathroom, or kitchen (or anything that might "hide" plumbing piping or make it less accessible).
First some pictures.
These pictures were taken back in October. The job was to replace the main shut-off valve, the inside shut-off for the hose bibb (outside water faucet), and the hose bibb itself.
Here are the before pictures:


As you can clearly see, these valves are in some "tight spots". The valve in the 3rd picture was particularly difficult to replace because it was so close to the "Tee" fitting and the "Tee" fitting was obstructed by the structure. As well, there were several wires obstructing the actual replacement process.
Why should you be concerned about my difficulties as a plumber?
Well, because whatever takes me more time (to think about and to do "safely"), will be reflected in our price.
Here are the after pictures of the same job.


Needless to say, I think most plumbers (ones who are proud of their work anyway), would want as much exposed and accessible plumbing as possible. It definitely makes sense from a "time" and "cost" perspective. This would also allow plumbing to become a more beautiful trade (beyond the looks of the plumbing fixtures).
Thank you,
Jay Bortnik
Journeyman Jay Plumbing
780-266-3939
Saturday, February 7, 2015
Do you hear running water in the night?
OR does your toilet make noises?
We have been getting more of these calls lately.
Maybe it is because it is winter and we are spending more time inside our houses (with the windows closed).
These noises could very well be caused by your toilet flapper (flush valve) allowing water to escape from your toilet tank. This in turn lowers the level in the tank which then activates that "fill valve" which is replacing the water that has leaked into your toilet bowl (and ultimately, down the drain). It will continue to do this until the flapper (and possibly fill valve) is replaced.
See images of "toilet tank flush valves"
If you need us to have a look at this (and possibly fix it, if indeed this is the cause), please give us a call at 780-266-3939.
Please read our SPECIAL OFFER before calling.
Thank you,
Jay Bortnik
AKA "Journeyman Jay"
North Edmonton, Alberta
780-266-3939
We have been getting more of these calls lately.
Maybe it is because it is winter and we are spending more time inside our houses (with the windows closed).
These noises could very well be caused by your toilet flapper (flush valve) allowing water to escape from your toilet tank. This in turn lowers the level in the tank which then activates that "fill valve" which is replacing the water that has leaked into your toilet bowl (and ultimately, down the drain). It will continue to do this until the flapper (and possibly fill valve) is replaced.
See images of "toilet tank flush valves"
If you need us to have a look at this (and possibly fix it, if indeed this is the cause), please give us a call at 780-266-3939.
Please read our SPECIAL OFFER before calling.
Thank you,
Jay Bortnik
AKA "Journeyman Jay"
North Edmonton, Alberta
780-266-3939
Tuesday, November 18, 2014
Real Plumbers - What does that mean?
Watch this video to find out.
Thank you,
Jay Bortnik
Journeyman Jay Plumbing
780-266-3939
Serving North Edmonton Homeowners
(who live in their own single-detached house)
Monday, November 10, 2014
Looking for the right plumbing materials
Plumbing is about the right plumber using the right tools to install the right materials.
Plumbing professionals should always be looking for better ways to do things.
That is why we attended CIPHEX 2014 - Plumbing & Heating Tradeshow (in Calgary) this past Wednesday/Thursday. (http://www.ciphexwest.ca/west2014/public/enter.aspx)
Along with all of the manufacturers' booths there were also seminars on plumbing topics.
I attended the seminar on water lines. There is some contention within the industry with regards to "flow rates" (in the plumbing code) for different materials (copper, pex, etc).
What most people may not know is that flow rates for different materials vary dramatically. So next time you think crimp pex (sold at home improvement stores) is just as good as the "other pex" or good old copper, think again. That's why you may want to engage the services of a professionally trained plumber like Journeyman Jay.

Picture of Journeyman Jay in front of the seminar room at CIPHEX 2014.

Picture of Journeyman Jay behind an interesting valve display.
Thank you,
Jay Bortnik
Journeyman Jay Plumbing
780-266-3939
Saturday, November 1, 2014
"Just" a New Bathroom - Finished
Before we start:
A big THANK YOU to our clients: Troy & Cassandra.
We really appreciate being welcomed into your home for the week or so (rough-in and, later the finishing) this took to complete.
Photos of the NEW Bathroom project we just finished.

The fixtures in this new bathroom need venting (the pipe going into the ceiling) to operate properly.
 This is the flange that connects the toilet to the piping below. It also holds the toilet to the floor.
In this case, the toilet flange is a little further from the wall to accommodate the "structural" floor joist that runs under the toilet. Typically the toilet flange is about 12.5" to 13" off the back wall.
 Water line for the toilet.
Wow. That's it, right? What about the hidden plumbing? Where are we going to get the water? Where is the waste going?
 Water line tubing and "soil" (term used when poop goes in it) pipe connected to WC (water closet) or toilet flange above.
 Waste pipe from LAV (bathroom sink) on left side which is connected to the bigger toilet pipe.
The toilet actually vents through the LAV pipe.
 We have to connect this new bathroom to the existing piping. In this case we were blessed with a 3" pipe coming from the clothes washer. But, this meant that we now had to vent a previously unvented fixture (clothes washer stand pipe). Back in the day, they did this different than we do today. Suffice to say we also re-piped the laundry so that our connection would conform to plumbing code.
 Lots of fun here. Back in the dark ages (1950s, 60s, even 70s), plumbers used a lot of cast iron for drainage (and connected it with LEAD - dangerous). Needless to say we had to make a few cuts into the cast iron to make our connection. Well it wasn't that straightforward. Here is what we found where we were going to connect the new bathroom piping. This pipe was only draining a clothes washer (for about 55 years). So we cut out the whole horizontal pipe up to where it went vertical and replaced it with plastic (abs). These cuts require special blades or special cutters (depending on preference or situation).
 Here is all the additional pipe we replaced (piled outside).
 This is what the attic looks like. There's plumbing in the attic too?? Yes there is. Remember the first picture with the vent pipe running up the wall. It has to eventually connect to a pipe that leads outside.
 More venting we installed. One pipe is from the laundry and the other is from the NEW bathroom.
We also had to cut cast iron to connect the NEW venting to the existing venting.
 Pipe must grade properly and must be properly supported (see metal strap with 2x4 board) holding pipe's grade (keeping it from sagging and filling with water - bad thing for a "dry vent")
 Here is our "green sticker" from the City of Edmonton Inspector.
He checked our piping and gave it his approval.
 Picture of the "rough-in" for the sink.


For a professional consultation (and possible estimate) give us a call at 780-266-3939.
A big THANK YOU to our clients: Troy & Cassandra.
We really appreciate being welcomed into your home for the week or so (rough-in and, later the finishing) this took to complete.
Photos of the NEW Bathroom project we just finished.
The fixtures in this new bathroom need venting (the pipe going into the ceiling) to operate properly.
In this case, the toilet flange is a little further from the wall to accommodate the "structural" floor joist that runs under the toilet. Typically the toilet flange is about 12.5" to 13" off the back wall.
Wow. That's it, right? What about the hidden plumbing? Where are we going to get the water? Where is the waste going?
The toilet actually vents through the LAV pipe.
We also had to cut cast iron to connect the NEW venting to the existing venting.
He checked our piping and gave it his approval.
A roughed-in bathroom.
(It wouldn't look like much if you didn't see all that was done)
Installing shut-off valves for the water lines for the LAV.
Braided supply tubes connecting the faucet to the water lines.
The faucet.
Installing tank to toilet bowl.
Cut those T-bolts.
The mark of a neat plumber.
The NEW bathroom.
To keep it simple we didn't show pictures of:
1. Upsizing water lines (from the water meter to the hot water tank to the other branch offs) to
accommodate new bathroom and meet plumbing code requirements for water flow..
(While doing this, we had to also change the "very old" main shut-off as it started to leak after
being turned on and off)
2. Re-piping the laundry.
So, as we mentioned in our previous BLOG posts - There are many other variables when adding a new bathroom such as: water line sizing, venting, and drainage capacity.
This also doesn't even scratch the surface on fire safety, materials, confined spaces, dangerous substances (that might be encased in the building materials of your house).
As you can see, these bathrooms must be well thought out.
These consultations and estimates differ from our normal consultations in that they involve lots of time and effort to solve plumbing challenges before anything is decided. Therefore we charge a reasonable fee for this service.
Thank you,
Jay Bortnik
Journeyman Jay Plumbing
780-266-3939
Friday, October 10, 2014
Save Money, Fix Your Drips
Hi again,
Dripping faucets drip more than water.
They drip money - cold hard cash (as some say).

Imagine that drip turning into spare change every day.
$0.06 per day
$1.92 per month
$23.08 per year (That's a pretty good run to the bottle depot).
(based on $1.96/cubic meter or 1000L of water)
REMEMBER: That is only the cost water ... for one single dripping faucet.
There are also waste water charges.....
......and heating costs
(notice the picture: it is usually the hot water dripping)
We were recently in one home (recently purchased older home), the bathroom faucet was dripping (see picture above), the shower was a continuous stream type of drip, and finally the outside faucet (hose bibb) had a steady drip.
***********************************************************************************
PLEASE NOTE: The EPCOR drip calculator does not match (not even close) the AWWA drip calculator. We will be checking out this discrepancy with EPCOR - Edmonton's water utility.
***********************************************************************************
The other thing to consider is that leaks only get worse, not better.
If you leave it too long, it will be like turning on the faucet ..... and leaving it on/
***********************************************************************************
Usually, in our experience, it happens to a faucet that cannot not be isolated (with a shut-off valve that works or even exists). Now to stop the flow, you have to turn off the main shut-off valve in the basement (by the water meter). In older houses, these valves start to leak from the stem (the thing that the handle is connected to), if constantly turned on and off.
As you can see, this could easily turn into quite a "plumbing emergency".
We know what this means - more money for your typical plumber to stop what he's doing right this minute to attend to your emergency. A costly proposition .... especially if it is in the middle of the night on a weekend.
Yeah, sure there are emergencies.
But if you have known about that "drip" for over a month, should it really be an emergency?
That's why we have this blog.
To educate homeowners on "plumbing reality."
EITHER everything will turn into a plumbing emergency ....
... OR you can start paying attention to drips, leaks, etc
AND take action to prevent a future emergency from taking place.
IF you live in NORTH Edmonton,
in your own home (single detached house),
we have a SPECIAL OFFER for you.
PLEASE CLICK HERE for details: http://www.journeymanjay.com/p/blog-page.html
Sincerely,
Jay Bortnik
Journeyman Jay Plumbing
780-266-3939
Dripping faucets drip more than water.
They drip money - cold hard cash (as some say).
Imagine that drip turning into spare change every day.
$0.06 per day
$1.92 per month
$23.08 per year (That's a pretty good run to the bottle depot).
(based on $1.96/cubic meter or 1000L of water)
REMEMBER: That is only the cost water ... for one single dripping faucet.
There are also waste water charges.....
......and heating costs
(notice the picture: it is usually the hot water dripping)
We were recently in one home (recently purchased older home), the bathroom faucet was dripping (see picture above), the shower was a continuous stream type of drip, and finally the outside faucet (hose bibb) had a steady drip.
***********************************************************************************
A slow leak of 60 drips per minute wastes:
Daily waste in liters/litres:
32.71
Monthly (30 days) waste in liters/litres:
981.3
Yearly waste in liters/litres:
11939.15
SOURCE: American Water Works Association: Drip Calculator
http://www.awwa.org/resources-tools/public-affairs/public-information/dripcalculator.aspxPLEASE NOTE: The EPCOR drip calculator does not match (not even close) the AWWA drip calculator. We will be checking out this discrepancy with EPCOR - Edmonton's water utility.
***********************************************************************************
The other thing to consider is that leaks only get worse, not better.
If you leave it too long, it will be like turning on the faucet ..... and leaving it on/
***********************************************************************************
Usually, in our experience, it happens to a faucet that cannot not be isolated (with a shut-off valve that works or even exists). Now to stop the flow, you have to turn off the main shut-off valve in the basement (by the water meter). In older houses, these valves start to leak from the stem (the thing that the handle is connected to), if constantly turned on and off.
As you can see, this could easily turn into quite a "plumbing emergency".
We know what this means - more money for your typical plumber to stop what he's doing right this minute to attend to your emergency. A costly proposition .... especially if it is in the middle of the night on a weekend.
Yeah, sure there are emergencies.
But if you have known about that "drip" for over a month, should it really be an emergency?
That's why we have this blog.
To educate homeowners on "plumbing reality."
EITHER everything will turn into a plumbing emergency ....
... OR you can start paying attention to drips, leaks, etc
AND take action to prevent a future emergency from taking place.
IF you live in NORTH Edmonton,
in your own home (single detached house),
we have a SPECIAL OFFER for you.
PLEASE CLICK HERE for details: http://www.journeymanjay.com/p/blog-page.html
Sincerely,
Jay Bortnik
Journeyman Jay Plumbing
780-266-3939
Wednesday, October 8, 2014
Is your plumbing GREEN?
Environmental (GREEN) solutions are all the rage these days.
However, there is a different kind of GREEN that you should be familiar with....


The GREEN sticker from the City of Edmonton Plumbing Inspector.
Why is this important?
If you are creating a new bathroom or moving a fixture (toilet, sink, tub) to another location a plumbing permit is required. One way to know that you have a "real" plumber doing the job for you is his/her ability to get a City of Edmonton Plumbing Permit. If they cannot obtain a plumbing permit then they are either not a real plumber or real business. The permit process (which is governed by the aptly named "Safety Codes Act of Alberta') is there to protect you, the home owner, from overtly dangerous conditions that could arise. It is also there to protect the water and sewage system as a whole.
The GREEN "pass" sticker (in Edmonton - I am not sure about how they pass plumbing in other jurisdictions) is a visible indication that the plumber/plumbing business, which you have engaged to do the work, has at least passed the minimum standards laid out in the Plumbing Code of Canada (and Alberta).
In other words, your plumber is NOT a quack. It is too bad they don't have this for other professions.
Thank you,
Jay Bortnik
Journeyman Jay Plumbing
780-266-3939
However, there is a different kind of GREEN that you should be familiar with....
The GREEN sticker from the City of Edmonton Plumbing Inspector.
Why is this important?
If you are creating a new bathroom or moving a fixture (toilet, sink, tub) to another location a plumbing permit is required. One way to know that you have a "real" plumber doing the job for you is his/her ability to get a City of Edmonton Plumbing Permit. If they cannot obtain a plumbing permit then they are either not a real plumber or real business. The permit process (which is governed by the aptly named "Safety Codes Act of Alberta') is there to protect you, the home owner, from overtly dangerous conditions that could arise. It is also there to protect the water and sewage system as a whole.
The GREEN "pass" sticker (in Edmonton - I am not sure about how they pass plumbing in other jurisdictions) is a visible indication that the plumber/plumbing business, which you have engaged to do the work, has at least passed the minimum standards laid out in the Plumbing Code of Canada (and Alberta).
In other words, your plumber is NOT a quack. It is too bad they don't have this for other professions.
Thank you,
Jay Bortnik
Journeyman Jay Plumbing
780-266-3939
Wednesday, September 24, 2014
Your House Plumbing: Main Shut-off Valve
Hi there!
Journeyman Jay here again to talk to you about your main shut-off valve and why you should probably replace it if it occasionally drips at the stem.
Listen to Journeyman Jay (my alter ego) as he describes
what happened during a recent "new bathroom addition."
Thank you,
Jay Bortnik - a.k.a. Journeyman Jay
Journeyman Jay Plumbing
See our special offer for Norh Edmontonians who live in and own their own "single detached house"
Journeyman Jay here again to talk to you about your main shut-off valve and why you should probably replace it if it occasionally drips at the stem.
Listen to Journeyman Jay (my alter ego) as he describes
what happened during a recent "new bathroom addition."
Thank you,
Jay Bortnik - a.k.a. Journeyman Jay
Journeyman Jay Plumbing
See our special offer for Norh Edmontonians who live in and own their own "single detached house"
Monday, September 22, 2014
"Just" a New Bathroom
We recently completed the plumbing "rough-in" (drainage/vent pipe and water lines for a bathroom).
And we just achieved another "Green Sticker" from the City of Edmonton (on our plumbing permit for this project).
I say "just" a new bathroom, but it involved re-piping the laundry drainage, adding venting for laundry and the new bathroom, and "upsizing" the water lines to accommodate more water demand in the house.
Most of the rough-in took place in the "crawl space" - about 2.5 to 3 ft high with lots of heating duct in the way (also very dusty - but that's life).
Here are a few pictures.
 (Photo above and below) The 3 inch drain that we installed (replacing the old cast iron pipe).
 The photo above is the 2" laundry drain connected to our re-piped 3" drain. Initially we were going to leave the cast iron in place and just cut into it, however it was all gooed up, so we replaced the whole length with ABS.
 One of the issues in the crawl space was its lack of space.
 The photo above is a 2" LAV (bathroom sink drain) acting as a wet vent to the 3" toilet drain on the right.
 Because the pipe hangers had to be so long, we opted to use pipe hangers that are almost never used in houses (you will mostly only see these hangers commercially). Hangers are important as they keep the grade of the pipe locked in so the waste can run downwards at a grade of about 1/4 inch per foot.


The photo above and below shows some of the water lines we installed. We tried to use mostly PEX in the crawl space, because soldering copper is a fire hazard (especially so in this cramped crawl space).
Also note that the PEX we used is Wirsbo or UPONOR brand. It significantly DIFFERS from the PEX that you can pick up at the home improvement stores. Needless to say there are advantages to using this type of PEX, however most plumbers don't use it because "it costs too much".

 The photo above and 2 photos below are the newly roughed-in Laundry Standpipe. When we first arrived, we found that the old laundry drain connected directly to a 3" drain which lead into the stack in the crawl space.
All you have to know here is that the original laundry did not meet current plumbing code, but did allow us to easily tie in the new bathroom in the crawl space because it was 3". However, this also necessitated venting to be installed off of the new and improved Laundry Standpipe (up the wall and into the attic which then connected to the bathroom venting and eventually the stack vent in a very tight spot in the attic - I might talk about that "fun day" sometime in the future).

The photos below should give you an idea of the spaces we had to work in. Notice the entrance to this crawl space and how short the clearance is once you are in it.


More pictures to come on this project.
Thank you,
Jay Bortnik
Journeyman Jay Plumbing
780-266-3939
And we just achieved another "Green Sticker" from the City of Edmonton (on our plumbing permit for this project).
I say "just" a new bathroom, but it involved re-piping the laundry drainage, adding venting for laundry and the new bathroom, and "upsizing" the water lines to accommodate more water demand in the house.
Most of the rough-in took place in the "crawl space" - about 2.5 to 3 ft high with lots of heating duct in the way (also very dusty - but that's life).
Here are a few pictures.
The photo above and below shows some of the water lines we installed. We tried to use mostly PEX in the crawl space, because soldering copper is a fire hazard (especially so in this cramped crawl space).
Also note that the PEX we used is Wirsbo or UPONOR brand. It significantly DIFFERS from the PEX that you can pick up at the home improvement stores. Needless to say there are advantages to using this type of PEX, however most plumbers don't use it because "it costs too much".
All you have to know here is that the original laundry did not meet current plumbing code, but did allow us to easily tie in the new bathroom in the crawl space because it was 3". However, this also necessitated venting to be installed off of the new and improved Laundry Standpipe (up the wall and into the attic which then connected to the bathroom venting and eventually the stack vent in a very tight spot in the attic - I might talk about that "fun day" sometime in the future).
 un
un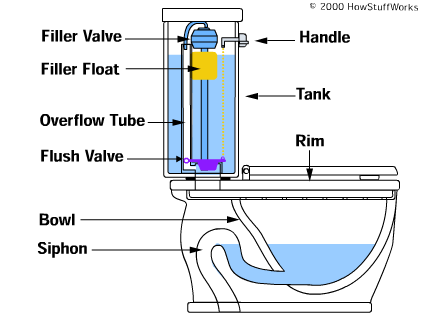
The photos below should give you an idea of the spaces we had to work in. Notice the entrance to this crawl space and how short the clearance is once you are in it.
More pictures to come on this project.
Thank you,
Jay Bortnik
Journeyman Jay Plumbing
780-266-3939
Subscribe to:
Posts (Atom)